

Solaris installation
Step by step guide to Solaris installation:
Solaris installation poses a challenges to the new Solaris sysadmins who have never done the installation of Solaris before . Though the installation itself is simple and straight forward but doing it the first time comes with its own anxiety associated with unexplored and unknown things .
The idea of this article is to introduce you with the procedure and sequence of event Solaris installation to build enough confidence to finish the installation on your own.
1. Before you begin
For Solaris installation on standalone Sun machine you need the following besides sun cpu :
A) Sun Monitor and Sun Keyboard
OR
For carrying the installation through the serial port A of Sun (ttya)
Dumb Terminal or PC with serial port communication software like HyperTerminal
AND
A null modem cable ( Pin 2 & 3 crossed 5 common ground in 9 Pin to 9 pin ; Pin 7 is common ground in 25 Pin connector ) connecting sun's serial port A with PC serial port.
B) You will also require a IP address, netmask and a host name for your system.
2. Getting Started
Installation starts at OK> prompt & you can get to ok> using any of the following method :
1. by pressing Stop A key sequence on a Sun Keyboard.
2. typing #init 0 if your system boots up directly .
3. Pressing ctrl-break or shift-break on a pc keyboard if using pc as
console through serial port.
4. If auto-boot feature is enabled system directly boots up
and gives you a # prompt .You can disable auto-boot so next time it
stays at ok prompt for starting installation.
#/usr/platform/sun4u/bin/eeprom auto-boot?=false
reboot the system.
3. Starting the installation
Insert the installation media - OS CD in CD drive and type boot cdrom at ok> prompt . Ok>boot cdrom
The first phase begins with system identification and gathers information about the system from the the user .System starts booting up and after initialization it asks for language and locale also terminal type in case of PC/terminal
Select your locale and DEC VT100 terminal type for terminal selection
Further installation through the terminal require response to the
selections through ESC and function keys and space bar which are
mentioned on the installation screen.
On the next screens, you are to identify the system as networked or non-networked, and set the default time zone and date/time. After this following host information is required :
A) A host name for the system
B) Whether the system is networked if yes you will have to
provide the IP address & netmask of this machine.
Next you will be asked to select the name services
Name services
[ ] NIS+
[ ] NIS
[ ] DNS
[X ] None
Select the service if you have complete details like domain names etc or select none to configure after installation.
You have to select a distribution type from among the choices choices
4. OS distribution & Disk configuration
After identification is complete the installation process proceeds on to the OS and disk configuration and need your input for these settings. Selection depends on role of your machine
Typical space requirement for Solaris 7 is given here.
[ ] Entire Distribution plus OEM support 64-bit 1242.00 MB (F4 to Customize
[X] Entire Distribution 64-bit .....…...….1215.00 MB
[ ] Developer System Support 64-bit.... 1154.00 MB
[ ] End User System Support 64-bit .….. 765.00 MB
[ ] Core System Support .............. .334.00 MB
Entire distribution with OEM has all software with some third party software
Entire distribution has all software without third party software .
Developer system has run time libraries for C software etc.
End user has X windows and CDE environment .
Core system is without X windows softwares etc.
If you are not sure select entire distribution.
You will be presented with choice to select the boot disk among the disks present in the system ,unless you have reasons select the c0t0d0 at boot disk.
[ X ] c0t0d0 (17269 MB) boot disk 17269 MB
[ ] c0t1d0 (17269 MB) 17269 MB
overlap partition represents entire disk and is slice s2 of the disk.
If any of the disk contain a preexisting partition you will be given a choice to preserve the partition .
Next the current layout is given ( if existing ) and you are asked to select between Automatic and Custom layout of disk partitions.
Automatic layout make a single partition of entire boot disk .
Customize option gives and option to create the partitions and select the sizes . Things to keep in mind while doing interactive or custom installation
Additional space is required in /var & /home if server is to handle mail and printing as mail and print files are formed in /var & if the user home directories are to be located on /home partition
A sample partition table may look like following .
File system/Mount point Disk/Slice Size
---------------------------------------
/ c0t0d0s0 300 MB
swap c0t0d0s1 2000 MB
overlap c0t0d0s2 17269 MB
/usr c0t0d0s3 2000 MB
/opt c0t0d0s4 1000 MB
/var c0t0d0s5 1000 MB
> The swap partition size depends on the size of RAM in the system if you are not sure of its size keep it double the RAM or more than RAM in the system.
> If you are not sure of individual partition sizes of / , /usr /opt & /var make one partition as / and keep its size sufficiently higher than the distribution size you have selected in earlier steps . Always keep in mind the future software that you might have to install like compilers applications etc and log files that will be generated and accumulate in /var directory or partition.
After you have specified the partition sizes it gives summary and error if any
Installation Option: Initial
Boot Device: c0t0d0s0
Client Services: None
Software: Solaris 2.7, Entire Distribution
File System and Disk Layout:
/ c0t0d0s0 300 MB
swap c0t0d0s1 2000 MB
/usr c0t0d0s3 2000 MB
/opt c0t0d0s4 1000 MB
/var c0t0d0s5 1000 MB
one more question is asked about rebooting
[X] Auto Reboot
[ ] Manual Reboot
Afterwards it starts configuring disk making partitions and installing software indicating the progress in a table .
MBytes Installed: 700.66
MBytes Remaining: 0.00
Installing:
0 20 40 60 80 100
After the installation is complete it customizes system files , devices ,logs , installs patches which are there in OS CD for that release. You can install recommended latest patches later
System then reboots or ask you to reboot depending upon the choice selected earlier .
5. After Installation
After rebooting it asks for new root passed and comes to console prompt where you can login as root install patches ,additional softwares , make user etc. etc.
Monday, September 21, 2009
How to install Ubuntu : The Ubuntu Installation Guide
When it comes to installing Ubuntu, there are so many useful snippets of information on blogs and guides all over the internet. If you Google “How to install Ubuntu”, you’ll see what I mean.
For an Ubuntu beginner or curious Windows intermediate user however, there’s no single, simple source of information when it comes to trying out your first Ubuntu installation. One thing I have noticed is that there’s a lot of technical jargon and sometimes unnecessary terminal commands in lengthy forum posts, but no simple “how to” guides, which I think might put some people off! A shame, when you think about how easy Ubuntu is to install, use and tweak to look really cool!
This post will talk you through your first Ubuntu installation, hopefully teaching you everything you need to know to give Ubuntu a try without breaking or removing your existing Windows installation. The end result will be a “vanilla” Ubuntu Installation running simultaneously with your Windows installation using either the GRUB bootloader, or WUBI, depending on how far you’d like to go on your first Ubuntu experience.
 I hope my guide makes installing Ubuntu an enjoyable, simple experience. By the end of the guide you should have a dual boot Windows / Ubuntu machine that happily plays music, video, and acts as a perfectly usable home office computer with Openoffice 3.0. For the really adventurous you could even run Windows XP inside Virtualbox, which is linked to later on in the guide. The Ubuntu OS is unique and seriously cool, so, enjoy the trip.
How to install Ubuntu from a CD:
1) Download the Ubuntu ISO from http://www.ubuntu.com/getubuntu/download and save to your desktop
2) Burn the ISO image to a blank CD using Roxio CD creator or similar:
3) Run the CD from “My Computer” – the CD should ask permission to run at which point you’ll see this option screen:
4) If you’d like to install Ubuntu using Wubi, select “install inside Windows” and follow the instructions. Installing with WUBI is ideal for a first taste of Ubuntu as you can remove from add/remove programs in Windows later on. This install process is really easy but you don’t get the same performance as if Ubuntu had a separate partition running on its EXT3 file system. The following screens are all based on the Wubi installer process, so you can follow the rest of the instructions below.
If you’d like to install Ubuntu separately to Windows, then skip to point 7) below.
Here’s what you see next:
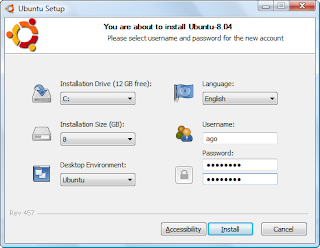
If you’ve got the space on your hard drive, go for 30gb or more for the installation size.
5) Now configure your installation using the simple settings options. You can specify the location of the Ubuntu installation on your Windows partition, the size of the Ubuntu installation, the Ubuntu flavour (Ubuntu, Kubuntu, Xubuntu, etc), your preferred language, and a username and password for the Ubuntu system.
When you click install, you’ll see this screen:
As soon as the files have finished downloading, you’ll see this:

6) That’s it! Click reboot now, and select “Ubuntu” on the startup screen. You now have a fully functional dual boot Windows / Ubuntu machine.
7) Click “Demo and full installation” and your computer will restart and boot into Ubuntu.
Here’s a guide on how to resize or shrink your Windows Vista partition. Follow those instructions before you reboot into the live version of Ubuntu and you’ll have a really easy time during the following steps. Maybe you’d like to install from a USB? Let’s have a quick look at the process of installing from a USB before we continue:
Here’s how to install Ubuntu on a USB drive from Windows Vista:
Format your USB stick with a FAT32 partition from Windows. You can get to the format dialogue by opening My Computer and right mouse clicking the removable drive icon. Click “Format” and follow the settings in the image below. You need a minimum 2gb USB stick.
9) Download UnetBootin. UNetbootin allows for the installation of various Linux/Ubuntu distributions to a partition or USB drive, so it’s no different from a standard install, only it doesn’t need a CD. The coolest thing about the application is that it’s a “portable” app. You don’t need to install it into Windows meaning UNetbootin will run on your Windows PC without “admin” privileges.
The new version of Ubuntu isn’t in the Distribution list supplied with UNetbootin yet, so use the downloaded Ubuntu ISO from earlier on. Add the ISO using the “Diskimage”, make sure your USB drive is selected below and click OK.
The ISO transfers to the USB pretty quickly, so soon after you click OK you’ll see this screen:
10) That’s it – when the installation process is complete, restart your computer and make sure it’s set up to boot from USB. On my HP Laptop, pressing F9 on the boot screen shows a boot order menu. Selecting “USB Hard Drive” follows a black screen, an Ubuntu logo, and finally, your new Ubuntu desktop appears.
Completing your Ubuntu installation, step by step
Installing Ubuntu is so easy that it requires very little effort past this point. If you’ve managed to repartition your hard drive and restart your computer you’ll sail through the next few steps:
11) Click “install” on the live desktop (top left)
12) Choose your language in the welcome screen

15) Set up your disk partition. This is probably the most “technical” part of the installation. When I shrunk my Windows Vista drive volume, I never formatted the new partition, which means the “use the largest continuous free space” option works nicely:
16) Choose your username and password:
17) Migrate your Windows documents and settings

18) You’re now ready to install your new Ubuntu installation

19) When the installation has finished, restart your computer (you’ll be instructed to remove your cd rom or USB drive). You’re now ready to begin using Ubuntu!
Friday, September 18, 2009
Install Windows XPInstallation process
Installing Windows XP can take up to two hours. To make the process more manageable, it has been broken up into several sections. When you are ready, install Windows XP:
•Part 1: Begin the installation
•Part 2: Continue the installation
•Part 3: Complete the installation
Part 1: Begin the installation
1.Insert the Windows XP CD into your computer and restart your computer.
2.If prompted to start from the CD, press SPACEBAR. If you miss the prompt (it only appears for a few seconds), restart your computer to try again.
7.Press ENTER again to select Format the partition using the NTFS file system, which appears by default.
Part 2: Continue the installation
Congratulations! Windows XP setup is complete. You can log on by clicking your name on the logon screen. If you’ve installed Windows XP on a new computer or new hard disk drive, you can now use the File and Settings Transfer Wizard to copy your important data to your computer or hard disk drive.
After logon, take a few minutes to validate your copy of Windows. Validation gives you access to hundreds of free downloads from the Microsoft Download Center. To learn about the new features Windows XP provides, click the Start button, click All Programs, click Accessories, and then click Tour Windows XP.
Installing Windows XP can take up to two hours. To make the process more manageable, it has been broken up into several sections. When you are ready, install Windows XP:
•Part 1: Begin the installation
•Part 2: Continue the installation
•Part 3: Complete the installation
Part 1: Begin the installation
1.Insert the Windows XP CD into your computer and restart your computer.
2.If prompted to start from the CD, press SPACEBAR. If you miss the prompt (it only appears for a few seconds), restart your computer to try again.

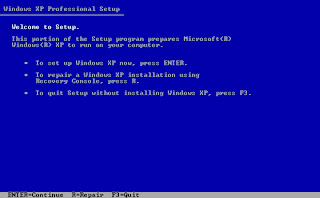
3.Windows XP Setup begins. During this portion of setup, your mouse will not work, so you must use the keyboard. On the Welcome to Setup page, press ENTER.
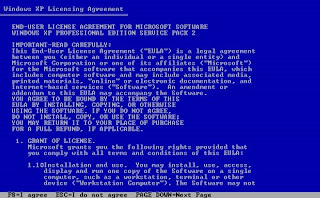
4.On the Windows XP Licensing Agreement page, read the licensing agreement. Press the PAGE DOWN key to scroll to the bottom of the agreement. Then press F8.
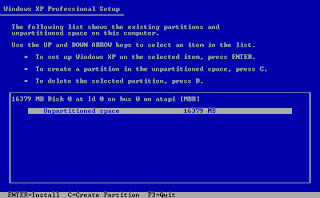
5.This page enables you to select the hard disk drive on which Windows XP will be installed. Once you complete this step, all data on your hard disk drive will be removed and cannot be recovered. It is extremely important that you have a recent backup copy of your files before continuing. When you have a backup copy, press D, and then press L when prompted. This deletes your existing data.
6.Press ENTER to select Unpartitioned space, which appears by default.
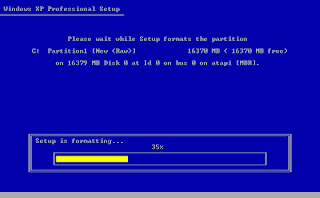
7.Press ENTER again to select Format the partition using the NTFS file system, which appears by default.

8.Windows XP erases your hard disk drive using a process called formatting and then copies the setup files. You can leave your computer and return in 20 to 30 minutes.
Part 2: Continue the installation
9.Windows XP restarts and then continues with the installation process. From this point forward, you can use your mouse. Eventually, the Regional and Language Options page appears. Click Next to accept the default settings. If you are multilingual or prefer a language other than English, you can change language settings after setup is complete.
10.On the Personalize Your Software page, type your name and your organization name. Some programs use this information to automatically fill in your name when required. Then, click Next.
11.On the Your Product Key page, type your product key as it appears on your Windows XP CD case. The product key is unique for every Windows XP installation. Then, click Next. 
12.On the Computer Name and Administrator Password page, in the Computer name box, type a name that uniquely identifies your computer in your house, such as FAMILYROOM or TOMS. You cannot use spaces or punctuation. If you connect your computer to a network, you will use this computer name to find shared files and printers. Type a strong password that you can remember in the Administrator password box, and then retype it in the Confirm password box. Write the password down and store it in a secure place. Click Next.
13.On the Date and Time Settings page, set your computer’s clock. Then, click the Time Zone down arrow, and select your time zone. Click Next.

14.Windows XP will spend about a minute configuring your computer. On the Networking Settings page, click Next. 
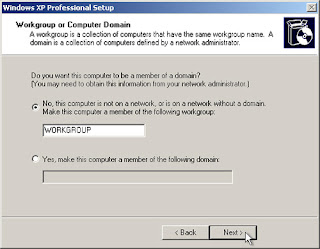
15.On the Workgroup or Computer Domain page, click Next.
Part 3: Complete the installation
16.Windows XP will spend 20 or 30 minutes configuring your computer and will automatically restart when finished. When the Display Settings dialog appears, click OK. 
17.When the Monitor Settings dialog box appears, click OK.

18.The final stage of setup begins. On the Welcome to Microsoft Windows page, click Next. 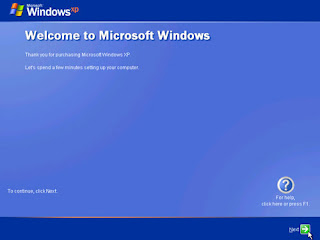
19.On the Help protect your PC page, click Help protect my PC by turning on Automatic Updates now. Then, click Next.
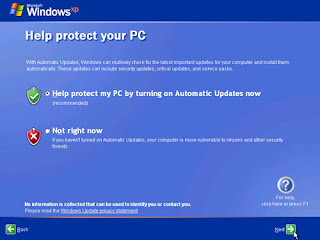
20.Windows XP will then check if you are connected to the Internet:
•If you are connected to the Internet, select the choice that describes your network connection on the Will this computer connect to the Internet directly, or through a network? page. If you’re not sure, accept the default selection, and click Next.

If you use dial-up Internet access, or if Windows XP cannot connect to the Internet, you can connect to the Internet after setup is complete. On the How will this computer connect to the Internet? page, click Skip.

21.Windows XP Setup displays the Ready to activate Windows? page. If you are connected to the Internet, click Yes, and then click Next. If you are not yet connected to the Internet, click No, click Next, and then skip to step 24. After setup is complete, Windows XP will automatically remind you to activate and register your copy of Windows XP.

22.On the Ready to register with Microsoft? page, click Yes, and then click Next.

23.On the Collecting Registration Information page, complete the form. Then, click Next.
24.On the Who will use this computer? page, type the name of each person who will use the computer. You can use first names only, nicknames, or full names. Then click Next. To add users after setup is complete or to specify a password to keep your account private, read Create and customize user accounts.

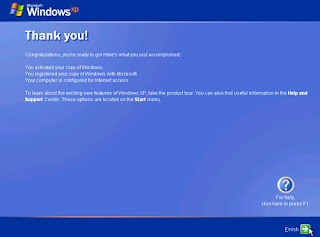
25.On the Thank you! page, click Finish.
Congratulations! Windows XP setup is complete. You can log on by clicking your name on the logon screen. If you’ve installed Windows XP on a new computer or new hard disk drive, you can now use the File and Settings Transfer Wizard to copy your important data to your computer or hard disk drive.
After logon, take a few minutes to validate your copy of Windows. Validation gives you access to hundreds of free downloads from the Microsoft Download Center. To learn about the new features Windows XP provides, click the Start button, click All Programs, click Accessories, and then click Tour Windows XP.
Thursday, September 17, 2009
Installing Windows 2000 Professional
To install Windows 2000 Professional, follow these steps:
1.Start the installation by using one of the following methods:
- Start from the Windows 2000 Professional installation CD-ROM. Make sure that the CD-ROM is set to start before the hard disk starts. Insert the CD-ROM, and then when you are prompted, press any key to start the Windows 2000 Professional Setup program.
- Start from boot disks. Insert Disk 1, and then insert each of the remaining three floppy disks when you are prompted to do so. For additional information about creating boot disks for Windows 2000, click the article number below to view the article in the Microsoft Knowledge Base: 197063 (http://support.microsoft.com/kb/197063/EN-US/ ) How to Create Setup Boot Disks for Windows 2000
- Start from within a current operating system. Insert the CD-ROM, and then, at a command prompt, type drive:\i386\winnt32.exe and then press ENTER, or if this is an installation on a computer that has no previous installation of Windows, type drive:\i386\winnt.exe and then press ENTER, where drive is the letter of the CD-ROM drive.
2.Setup inspects your computer's hardware configuration and then begins to install the Setup and driver files. When the Microsoft Windows 2000 Professional screen appears, press ENTER to set up Windows 2000 Professional.
3.Read the license agreement, and then press the F8 key to accept the terms of the license agreement and continue the installation.
4.When the Windows 2000 Professional Setup screen appears, either press ENTER to set up Windows 2000 Professional on the selected partition, or press C to create a partition in the unpartitioned space.
5.If you choose to install Windows 2000 Professional on a file allocation table (FAT) partition, specify whether you want to:
- Leave the current file system intact.
- Format the partition as FAT16.
- Convert the existing file system to the NTFS file system.
- Format the partition by using the NTFS file system.
Press ENTER after you make your selection. Setup examines the existing hard disks and then copies the files that are needed to complete the installation of Windows 2000 Professional. After the files are copied, the computer restarts.
Important Do not press a key to boot from your CD-ROM drive when your computer restarts.
6.When the Windows 2000 GUI Mode Setup Wizard appears, click Next to start the wizard. Setup detects and installs such devices as a specialized mouse or keyboard.
7.When the Regional Options dialog box appears, customize your installation of Windows 2000 Professional for locale, number format, currency, time, date, and language, if necessary. Click Next.
8.In the Personalize Your Software dialog box, type your name and the name of your organization, and then click Next.
9.In the Product ID dialog box, type the 25-character product key, and then click Next.
10.In the Computer Name and Password dialog box, either accept the default name that Setup generates or assign a different name for the computer. When you are prompted for an administrative password, type a password for the Administrator account. (You can leave the box blank; however, this is not recommended.) Click Next.
11.In the Date and Time Settings dialog box, set the correct date and time for your computer. You can also specify which time zone you are in and set the computer to automatically adjust the clock for daylight saving time. Click Next.
12.Setup installs the networking software and detects your network settings. When the Network Settings dialog box appears, click either
- Typical to set default network settings such as File and Print Sharing for Microsoft Networks, Client for Microsoft Networks, and TCP/IP protocol that uses Dynamic Host Configuration Protocol (DHCP), or
- Custom to specify the network components that you require for your network environment,
and then click Next.
13.In the Workgroup or Computer Domain dialog box, specify the workgroup or the domain to join. If you indicate that you are part of a domain, specify your domain user name and password. Click Next.
Setup installs the networking components.
14.During the final stage of installation, Setup installs Start menu items, registers components, saves settings, and removes temporary files. When the Completing the Windows 2000 Setup Wizard dialog box prompts you to do so, remove the Windows 2000 CD-ROM, and then click Finish to restart the computer.
15.After the computer restarts, click Next in the Welcome to the Network Identification Wizard dialog box.
16.In the Users of This Computer dialog box, specify either that users must enter a user name and password or that you want Windows 2000 to automatically log on a specific user when the computer starts. Click Finish.
When the Windows 2000 Professional desktop appears, the installation is complete.Thursday, August 27, 2009
Resource-Allocation Graph
A set of vertices V and a set of edges E.
A set of vertices V and a set of edges E.
- V is partitioned into two types:
=>FP = {P1, P2, …, Pn}, the set consisting of all the processes in the system.
=>FR = {R1, R2, …, Rm}, the set consisting of all resource types in the system. - request edge – directed edge P1 ® Rj.
- assignment edge – directed edge Rj ® Pi

Resource-Allocation Graph Algorithm
- Claim edge Pi ® Rj indicated that process Pj may request resource Rj; represented by a dashed line.
- Claim edge converts to request edge when a process requests a resource.
- When a resource is released by a process, assignment edge reconverts to a claim edge.
- Resources must be claimed a priori in the system.
Resource-Allocation Graph and Wait-for Graph
 Resource-Allocation Graph Corresponding wait-for graph
How did you know if there is a deadlock based on a resource allocation graph?
- In a multiprogramming system, processes request resourceused by other processes then the process enters a processes are also in a waiting state, we have deadlock.
Example of a Resource Allocation Graph
 Resource allocation graphs are drawn in order to see the allocatioand resources easily. In these graphs, processes are represented are represented by boxes. Resource boxes have some number available number of that resource, that is number of instances.
• If the resource allocation graph contains no cycles then there is no deadlock in the system at that instance.
• If the resource allocation graph contains a cycle then a deadlock may exist.
• If there is a cycle, and the cycle involves only resources which have a single instance, then a deadlock has occurred.
Resource Allocation Graph With A Deadlock
*In addition to the request and assignment edges, a claim edge is also introduced.
*Claim edge Pi ® Rj indicated that process Pj may request resource Rj in future; represented by a dashed line.
*Claim edge converts to request edge when a process requests a resource.
*When a resource is released by a process, assignment edge reconverts to a claim edge.
*Resources must be claimed a priori in the system. That is, before a process starts executing, all of its claim edges must already appear in the resource-allocation graph.
*Suppose that process Pi requests resource Rj. The request can be granted only if converting the request edge if converting the request edge Pi®Rj to an assignment edge does not result in a cycle in the resource-allocation graph. That is we use a cycle detection algorithm is used. If no cycle exits, the process Pi will have to wait.
Resource Allocation Graph With A Cycle But No Deadlock
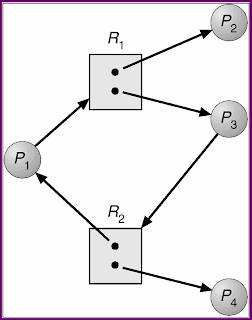 *2 resources "R1, R2"
*4 processes "P1, P2, P3, P4"
*P1 and P3 is requesting a process to R1 and R2 respectively.
*P2 and P3 holds an instance of R1
*P1 and P4 holds an instance of R2
*There is no DeadLock
Resource-Allocation Graph For Deadlock Avoidance
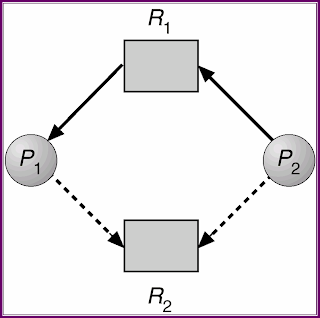
The Resource Allocation Graph (RAG) is composed of 2 processes and 2 resources.
· P1 holds an instance of R1
· P2 requests an instance of R1
· P1 and P2 may request an instance of R2
Unsafe State In Resource-Allocation Graph
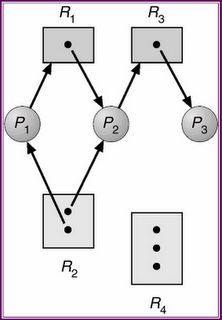
*the graph shows that R1 is holding the instances of P1, then P1 is requesting for a resource in R2, then R2 is holding the instances of P2 and P2 is requesting instance of R1.
Thursday, August 20, 2009
Methods for Handling
Deadlock
• Prevent
– write code such that the necessary conditions can
never hold simultaneously
• Avoid
– dynamically ensure that a deadlock state is not
reachable.
• Detect and recover
– allow deadlock but provide mechanisms to detect
it and recover (e.g., kill a process)
• Ignore (ostrich approach)
pretend they cannot occur and reboot if they do.
Subscribe to:
Posts (Atom)